IZH-46M pistol grip PICS

If you wish to make a donation to this forum's operation , it would be greatly appreciated.
https://www.paypal.com/paypalme/targettalk?yours=true

Moderators: pilkguns, m1963, David Levene, Spencer, Richard H

Forum rules
If you wish to make a donation to this forum's operation , it would be greatly appreciated.
https://www.paypal.com/paypalme/targettalk?yours=true
g333

IZH-46M pistol grip PICS

Post by g333 »

Have looked at these links;

http://woodsandwateroutdoors.com/IZHPage.htm

http://www.pilkguns.com/masprlist.htm#izh46mgrips

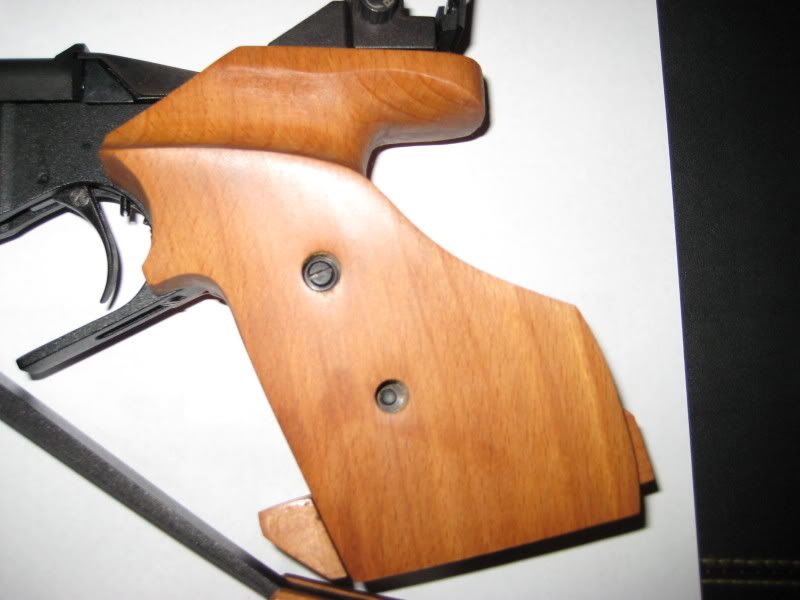
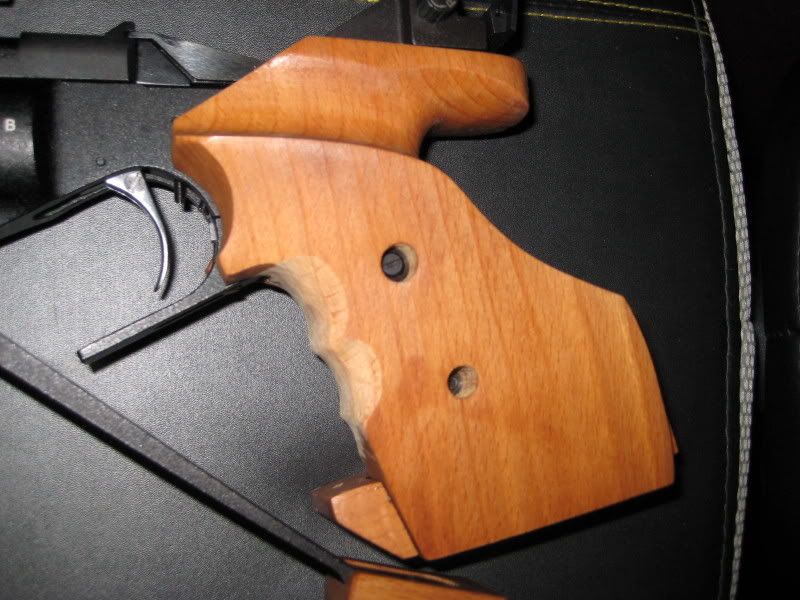
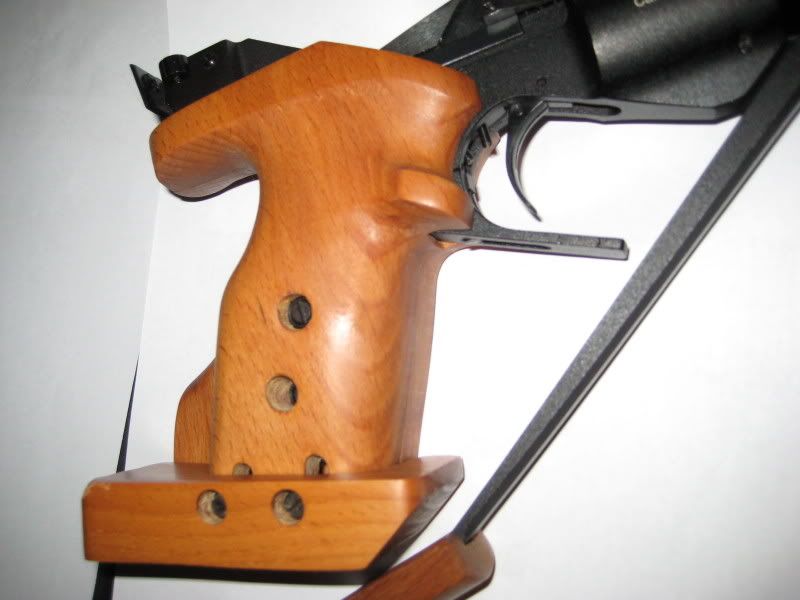
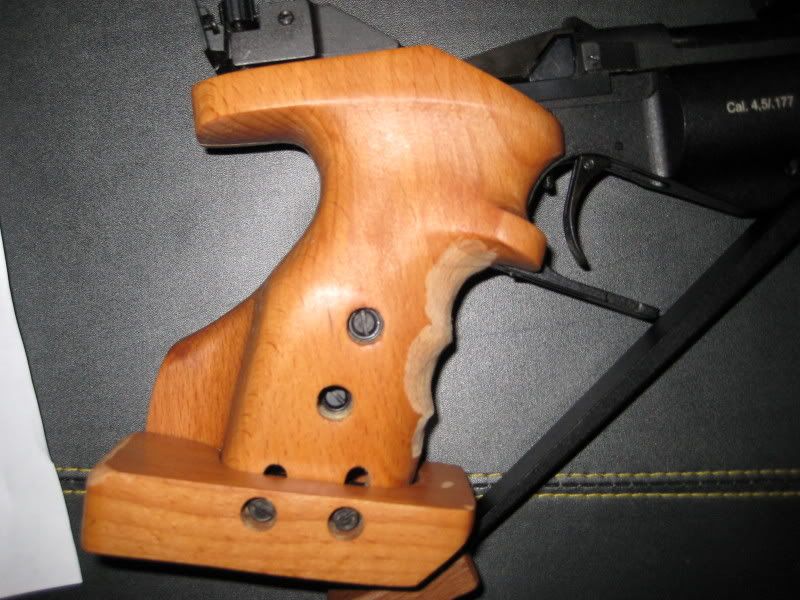
and all though helpful, I would like some close up pics of peoples izzy grips whether after market or personally done your self.
I understand that all hands are different and I am not going to be copying one or another since it may not suit my hand and or hold.
What I am looking for are some pictures to get an idea of how people are shaping their grips and what they are implementing into their design. I can then determine if it will be beneficial to me or not and to implement it or not.
I have a dremel and will give this my best shot taking a little off at a time. I do have small hands so I know I will be taking quite a bit off but I would rather be on the safer side so a little at a time over the next 2-3months is probably what I will do to get 95% there/completion.
Trying to avoid buying aftermarket grips....for now at least.

I have tried 2 other forums and it seems no one has modified their grips themselves, dont want to discuss it or there are not many izzy owners reading those 2 forums that will make a post.

So far;
Image
Image

Image
Image

Again, pics would be GREAT.
Thanks.
ERIK_A
Posts: 12
Joined: Wed Jun 13, 2007 6:48 am
Location: NC ...PA Sometimes

Post by ERIK_A »

I have great nterest in this topic as well.
bigred
Posts: 31
Joined: Fri Jan 12, 2007 2:43 pm
Location: Kildare, Ireland

Post by bigred »

Wait till I get home and take a few photos of mine - I've gone to town on it and the grip is unrecognisable compared to the one I got on it initially. IMHO, it's as good now as any Morini grip!
ERIK_A
Posts: 12
Joined: Wed Jun 13, 2007 6:48 am
Location: NC ...PA Sometimes

Post by ERIK_A »

Cant wait.
Guest

Post by Guest »

I'll be standing by to see these grips. Thanks in advance for your efforts.
BTW, is there any PRINTABLE 10M or reduced size target that has the 5 or 6 ring on in AND MORE than 4 targets per page. I use the reduced 6M with 4/pg and would like more. I find it tough sometimes to score shooting 5 shots to one ring. 60 shots is a lot, how do you guys practice without going through reams of paper?
Yes, I am quite new to this.
Thanks.
bntii
Posts: 14
Joined: Sat Dec 15, 2007 9:15 pm

Targets

Post by bntii »

Good morning,

I am also just starting out and shooting a Izzy.
This is the software I use:

http://home.hiwaay.net/~ispellan/Airguns.html

It has targets loaded for many disciplines including 10 ap and reduced range targets etc. Pick the number of bulls to print per page and you may set up a matrix as well. I print on old pen plotter paper which punches the bull very well with little or no tearing. I heard that some put a bit of masking tape behind the bull to get clean holes when using typing paper. Look around a bit to find paper that prints clean holes as it is a frustration otherwise. If I did not have a couple of reams of this plotter paper I believe I would just purchase bulk targets and not look back.

I just shot for the first time a five shot 1/4" group at 6m!

Enjoy- It's a great sport.
bigred
Posts: 31
Joined: Fri Jan 12, 2007 2:43 pm
Location: Kildare, Ireland

Here they are....

Post by bigred »

NOTE
I didnt just do everything below in one go. It was a bit at a time, with shooting in between to be sure I was doing what was needed. Not everything I did will work for you. I've huge hands, so you may need more or less adjustments in some places.
Hope it gives you some pointers.
By the way - I'm not a carpenter or woodturner and have no varnish, so it doesnt exactly look like a master craftsman job, but it works!


Grips updated as follows:

Right Side
1. Removed some of the wood in the roof of the grip - was a bit tight on my hand
2. Reduced the bump here - hand fits around the grip better now
3. Took some away here to in order to get a better fit
4. Shallowed out the groove for my trigger finger. I was tending to rest on this and it was leading to uneven finger placement on trigger
5. Cut nice deep finger grooves to ensure consistency of finger position, as well as being able to reach around the grip

Image

Left Side of Grip
1. You can see the finger grooves continue around the side. I know I'm in the correct position as the tip of my index finger just touches the screw hole
2. Cut in deeply here towards the breech to allow the web of my thumb-index finger to fit better

Image

Rear
Have pretty much created a full thumb rest here. It sits comfortably and is consistent shot-to-shot

Image

Hand Rest
My attempt at stippling the grip :-)
Did it with my Dremel and a small engraving tip - stop my hand from slipping during a match when things start to get a bit sweaty!

Image

And the Final Package
I'm shooting since October and my match best is 525, so I am quite happy with my setup
Image
David Levene
Posts: 5617
Joined: Mon Mar 01, 2004 12:49 pm
Location: Ruislip, UK

Re: Here they are....

Post by David Levene »

bigred wrote:1. Removed some of the wood in the roof of the grip - was a bit tight on my hand
It's a bit difficult to be sure from the pictures but you might want to check the top left hand section of rule 8.17.0 of the 2nd printing of the ISSF 2005 Pistol rules (don't look at the 1st printing which had totally different, less clear, drawings).

I cannot be sure but it looks like the "roof" on your grip is slightly lower to the right of the centre line than it is at the centre line.

A word of warning to other users, don't assume that factory grips comply with the rules. Many Morini 162EI grips, including mine, had to be modified to comply. Examples of other guns have also failed.

I don't think the meaning of the rule actually changed with the 2nd printing, it's just that the new drawings made the rule clearer.
bigred
Posts: 31
Joined: Fri Jan 12, 2007 2:43 pm
Location: Kildare, Ireland

Re: Here they are....

Post by bigred »

David Levene wrote: I cannot be sure but it looks like the "roof" on your grip is slightly lower to the right of the centre line than it is at the centre line.
Thanks for highlighting this. I wasnt aware of that requirement in the rules. As it currently stands, the gun is a very tight fit into the ISSF pistol box. I will have to take a few mm off the high parts on the left side of it to make it fit more easily (Seems to be too wide). It could very easily be failed as a result of this.
GS3
Posts: 6
Joined: Thu Jan 31, 2008 11:11 pm

Post by GS3 »

Bntii: Thanks, I will check that out and hopefully it will work well. ¼”, 5 shots @ 6M…dang!!!!!

Bigred: Amazing pic!!! Love the #’s and arrows. What program did you use to implement the #’s and arrows? I figured that I actually need to dremel those exact areas but until I saw that pic of yours, I was kinda unsure how to go about it. A little at a time is still my approach. Your reply was/is a very big help for me.

Thanks to all that replied. This was very useful and I am very glad I asked this question on this forum. Yet another airgun forum I am a now a member of (that makes 4) :-)
ERIK_A
Posts: 12
Joined: Wed Jun 13, 2007 6:48 am
Location: NC ...PA Sometimes

Post by ERIK_A »

nice grips! Any more out there. Any buddy carve thier own?
Last edited by ERIK_A on Sat Feb 02, 2008 11:11 pm, edited 1 time in total.
Tom Amlie

Re: Here they are....

Post by Tom Amlie »

David Levene wrote: I cannot be sure but it looks like the "roof" on your grip is slightly lower to the right of the centre line than it is at the centre line.
David - are you referring to the 3rd picture (from the rear)? Is the issue that there is a slight downward slope to the right of the grip parting line? Does the lowest part have to be precisely at the centerline?

Tom
David Levene
Posts: 5617
Joined: Mon Mar 01, 2004 12:49 pm
Location: Ruislip, UK

Re: Here they are....

Post by David Levene »

Tom Amlie wrote:
David Levene wrote: I cannot be sure but it looks like the "roof" on your grip is slightly lower to the right of the centre line than it is at the centre line.
David - are you referring to the 3rd picture (from the rear)? Is the issue that there is a slight downward slope to the right of the grip parting line? Does the lowest part have to be precisely at the centerline?
That's the one, and yes, no part may be lower than the centre.

You have to read (the possibly confusing) 8.16.0 Note a) in addition to the drawings in 8.17.0 (2nd printing only, not the same as the 1st printing).

One caveat, remember that I am always using ISSF rules. I cannot guarantee that USAS rules are always the same.
rrpc
Posts: 87
Joined: Thu May 31, 2007 10:11 am
Location: Ireland

Post by rrpc »

bigred

You should get hex screws for the grip and the shelf. They're far easier to tighten and adjust than the standard slot-head screwdriver ones fitted, which you can never seem to tighten satisfactorily.

I think they're a standard M4 thread.
bigred
Posts: 31
Joined: Fri Jan 12, 2007 2:43 pm
Location: Kildare, Ireland

Post by bigred »

GS3 wrote:Bigred: Amazing pic!!! Love the #’s and arrows. What program did you use to implement the #’s and arrows?
Glad I could help. It's easy to add stuff to a photo. If you're using Windows, get a tool called Snagit. It's meant for capturing screenshots, but has a brilliant editor that allows you to add shapes, numbers etc. I actually did mine on my Mac. I pasted the photo into a blank Keynote slide (the Mac version of Powerpoint) and added the arrows and numbers. It allows you to export as a jpg.
rrpc wrote:You should get hex screws for the grip and the shelf. They're far easier to tighten and adjust than the standard slot-head screwdriver ones fitted, which you can never seem to tighten satisfactorily.

I think they're a standard M4 thread.
It's been a pain to keep tight alright. They always need a half turn before I shoot. I lost one of the washers for the palm shelf and the screw has bored itself in. I must get down and get it all replaced. Another reason to visit the local hardware store. Thanks!
User avatar
Fred Mannis
Posts: 1298
Joined: Sun Aug 29, 2004 8:37 pm
Location: Delaware

ISSF AP Grip Rules

Post by Fred Mannis »

David Levene wrote:
bigred wrote:1. Removed some of the wood in the roof of the grip - was a bit tight on my hand
It's a bit difficult to be sure from the pictures but you might want to check the top left hand section of rule 8.17.0 of the 2nd printing of the ISSF 2005 Pistol rules (don't look at the 1st printing which had totally different, less clear, drawings).

I cannot be sure but it looks like the "roof" on your grip is slightly lower to the right of the centre line than it is at the centre line.

A word of warning to other users, don't assume that factory grips comply with the rules. Many Morini 162EI grips, including mine, had to be modified to comply. Examples of other guns have also failed.

I don't think the meaning of the rule actually changed with the 2nd printing, it's just that the new drawings made the rule clearer.
David,
That is a very interesting point you make. It is certainly not clear from the written rules that the "roof" of the grip must be flat. The factory grips on my LP1 definitely are not in compliance. Looking at the 2007 USAS Pistol Rules - they are still based on the ISSF first printing with the older drawing. My take is that a "slanted roof" is allowed here.
Spencer
Posts: 1888
Joined: Fri Feb 24, 2006 9:13 pm
Location: Sydney, Australia
Contact:

Re: Here they are....

Post by Spencer »

David Levene wrote:
Tom Amlie wrote:
David Levene wrote: I cannot be sure but it looks like the "roof" on your grip is slightly lower to the right of the centre line than it is at the centre line.
David - are you referring to the 3rd picture (from the rear)? Is the issue that there is a slight downward slope to the right of the grip parting line? Does the lowest part have to be precisely at the centerline?
That's the one, and yes, no part may be lower than the centre.

You have to read (the possibly confusing) 8.16.0 Note a) in addition to the drawings in 8.17.0 (2nd printing only, not the same as the 1st printing).

One caveat, remember that I am always using ISSF rules. I cannot guarantee that USAS rules are always the same.
David,

your "no part may be lower than the centre" is presumably a way of expressing rule wording "The grip must not encircle the hand"

There is no requirement that the centre of the grip (as held in the shooter's hand) be the centre of the pistol. In the photo shown, it would depend on where this shooter holds this grip: i.e. the grip would be 'legal' for some, and not for others.

Spencer
David Levene
Posts: 5617
Joined: Mon Mar 01, 2004 12:49 pm
Location: Ruislip, UK

Re: ISSF AP Grip Rules

Post by David Levene »

Fred Mannis wrote:
David Levene wrote:
bigred wrote:1. Removed some of the wood in the roof of the grip - was a bit tight on my hand
It's a bit difficult to be sure from the pictures but you might want to check the top left hand section of rule 8.17.0 of the 2nd printing of the ISSF 2005 Pistol rules (don't look at the 1st printing which had totally different, less clear, drawings).

I cannot be sure but it looks like the "roof" on your grip is slightly lower to the right of the centre line than it is at the centre line.

A word of warning to other users, don't assume that factory grips comply with the rules. Many Morini 162EI grips, including mine, had to be modified to comply. Examples of other guns have also failed.

I don't think the meaning of the rule actually changed with the 2nd printing, it's just that the new drawings made the rule clearer.
That is a very interesting point you make. It is certainly not clear from the written rules that the "roof" of the grip must be flat. The factory grips on my LP1 definitely are not in compliance. Looking at the 2007 USAS Pistol Rules - they are still based on the ISSF first printing with the older drawing. My take is that a "slanted roof" is allowed here.
I was so happy when the 2nd printing came out as the new drawing clarified what I always thought the position to be. To be fair, the old drawing showd the same minimum of 90 degrees, just not as clearly.

That part of the grip does not have to be flat, it just mustn't curve downwards.

As I said earlier, I can only comment with regard to ISSF rules. USAS rules don't really have much relevance outside of the US.
David Levene
Posts: 5617
Joined: Mon Mar 01, 2004 12:49 pm
Location: Ruislip, UK

Re: Here they are....

Post by David Levene »

Spencer wrote:David,

your "no part may be lower than the centre" is presumably a way of expressing rule wording "The grip must not encircle the hand"

There is no requirement that the centre of the grip (as held in the shooter's hand) be the centre of the pistol. In the photo shown, it would depend on where this shooter holds this grip: i.e. the grip would be 'legal' for some, and not for others.

Spencer
I don't think I agree with you Spencer. It's a shame they used the German word "Griffachse" on the drawing. Can any German speakers give us a translation, online translation is too literal.

The "1st Printing" drawing was actually a bit clearer in this regard as it showed the centre-line going through the centre of the rear sight notch.
toznerd

Post by toznerd »

Griffachse simply means "grip axis". The German word for center is "Mitte". I translate the picture as the vertical axis of the grip, as seen from the front or rear, when oriented in a normal shooting position.

For the sake of argument, what is the center of the grip axis? One-half the thickness at a specified point? Where the manufacturer splits the halves (if the grip separates) Center, as in plumb with the bore line? What if you cant your grip (most grips have a slight cant, plus a lot of guns allow the user to add cant)- does the vertical axis remain perpendicular to the horizon, or does it follow the axis of the shooters knuckles?

I say we replace our grips with broom handles, and make it challenging.

toznerd
Post Reply